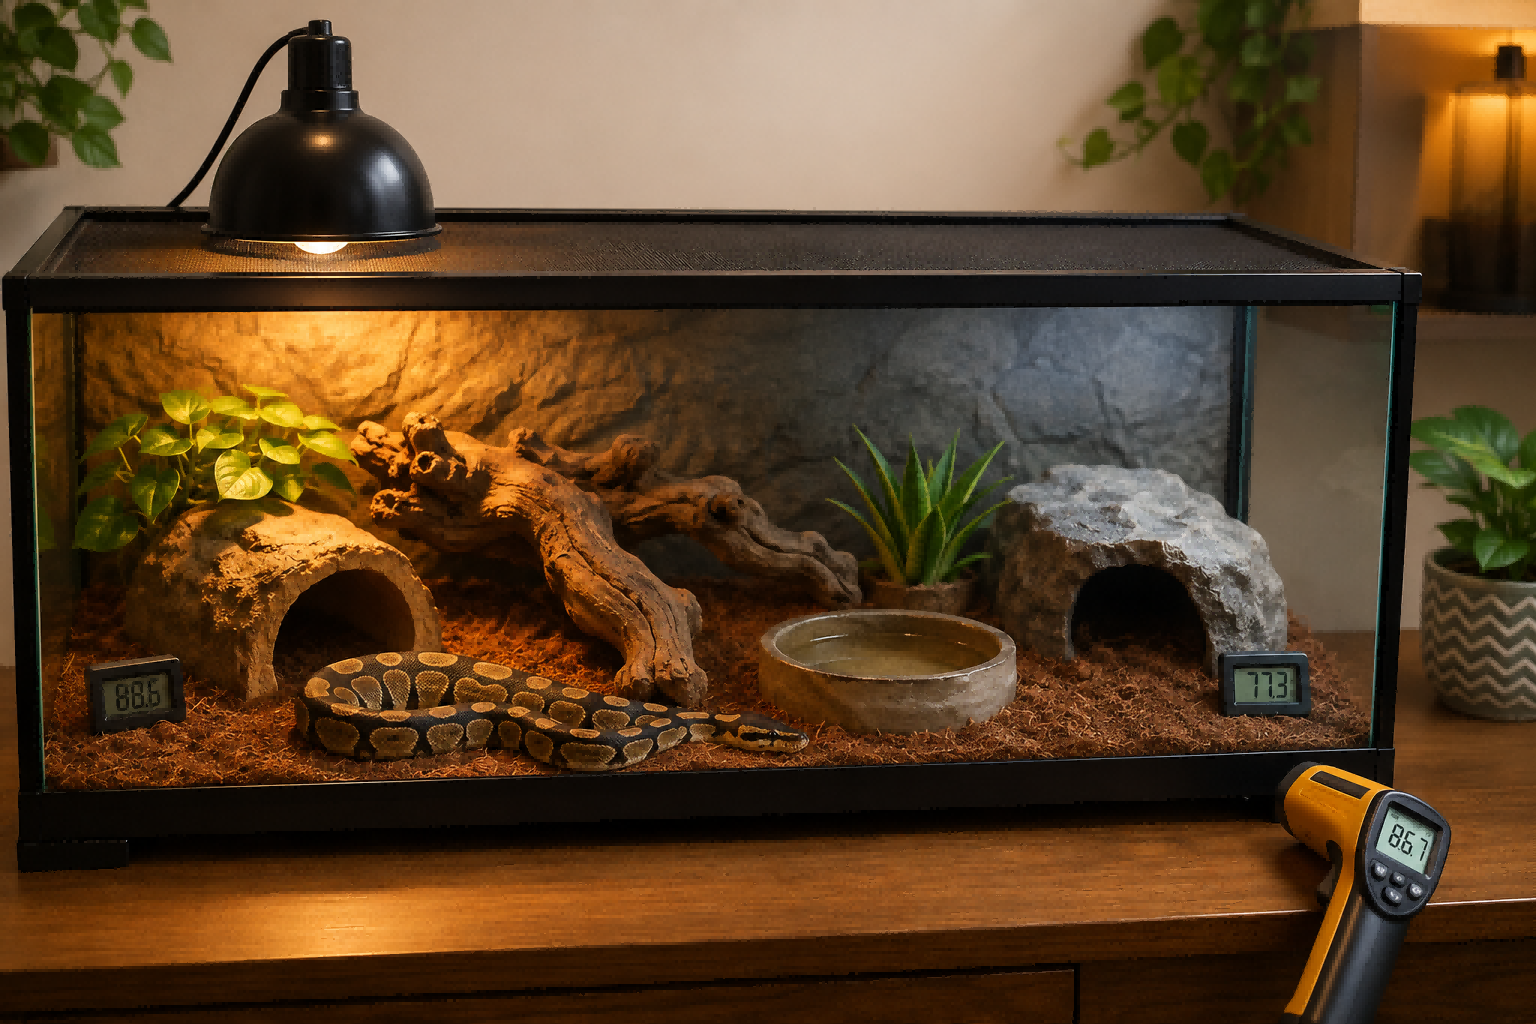
A snake enclosure should not be one uniform temperature.
Snakes regulate body temperature by moving between warmer and cooler areas. A safe setup therefore needs a controlled heat source at one end, a cooler retreat at the other, secure hides across the gradient and independent temperature monitoring.
This guide explains the heating system itself: how to choose a heat source, select the correct thermostat, position probes, measure air and surfaces, and test the enclosure before adding the snake.
It does not provide one universal temperature chart for every snake species.
Important: Temperature and humidity requirements vary greatly between species. A corn snake, royal or ball python, boa, hognose snake and tropical tree snake should not automatically receive the same heating configuration or target temperatures. Confirm the needs of the exact species before setting the thermostat.
The Basic Snake Heating System
A beginner-friendly heating system has four separate functions:
| Function | Equipment | What it does |
|---|---|---|
| Create heat | Overhead lamp, radiant panel, ceramic heater or other suitable source | Warms one end of the enclosure |
| Regulate heat | Compatible thermostat | Controls the output of the heat source |
| Monitor the gradient | Warm- and cool-side digital thermometers | Checks enclosure air or probe-location temperatures |
| Verify surfaces | Infrared thermometer | Checks hide floors, basking surfaces and substrate |
The thermostat controls equipment. The thermometers tell you what environment the snake actually receives.
They are not interchangeable.
Step 1: Identify the Exact Snake Species
Do this before buying the heater.
Different snakes may require different:
- Warm-side temperatures
- Cool-side temperatures
- Basking opportunities
- Nighttime temperature drops
- Humidity levels
- Enclosure heights
- Heat-source types
- Light cycles
Even closely related species may come from different climates and use their habitats differently.
Before building the setup, write down:
- The exact common and scientific name
- Adult size
- Natural activity pattern
- Preferred warm and cool ranges
- Humidity requirements
- Whether overhead basking is recommended
- Whether nighttime heat is needed in your home
- The minimum secure enclosure size
Use a current species-specific care guide and advice from a reptile-experienced veterinarian.
Step 2: Position the Heat Source at One End
The heat source should normally sit toward one end of the enclosure.
This creates:
- A warm zone
- A middle transition zone
- A cooler retreat
Do not place the primary heater in the center unless a species-specific enclosure design requires it. Centered heating can reduce the usable distance between warm and cool areas.
The snake should be able to move completely away from the heat source.
A larger enclosure usually makes it easier to build a useful gradient than a very small tank.
Place the Enclosure Carefully
Keep the enclosure away from:
- Direct sunlight
- Radiators
- Heating vents
- Air-conditioning outlets
- Draughty doors
- Appliances that generate heat
Household conditions can change the enclosure more than beginners expect.
Step 3: Choose the Appropriate Heat Source
There is no single best heater for every snake enclosure.
The correct choice depends on species, enclosure design and whether the heat is needed during the day, at night or both.
Dimmable Halogen or Incandescent Basking Lamp
Best suited to visible daytime heating.
It can create:
- A bright warm zone
- Heated surfaces
- A clear day-and-night cycle
Use a white or natural warm-white bulb rather than a colored red, blue or purple bulb.
A visible basking lamp should normally switch off at night.
Deep Heat Projector
A lightless overhead heat source used in some reptile setups.
It still requires:
- A compatible thermostat
- Safe mounting
- A protective guard when accessible
- Independent temperature checks
Do not assume that “lightless” means it is safe to leave unregulated.
Ceramic Heat Emitter
Produces heat without visible light.
It may be used for ambient or nighttime heat in suitable enclosures, but it can become extremely hot and must be guarded and thermostat-controlled.
Radiant Heat Panel
Often used in larger PVC or wooden enclosures.
A panel can provide broad overhead warmth but must be:
- Correctly sized
- Securely installed
- Controlled by a compatible thermostat
- Positioned according to the manufacturer’s instructions
Heat Mat or Heat Tape
Provides contact heat to a limited area.
It may be used in some species-specific setups, but it should never run without a thermostat.
A heat mat mainly warms the surface it contacts. It may not create the same air and surface gradient as overhead heating.
Do not cover a heat mat in a way that traps excessive heat, and never place one inside the enclosure unless the product is specifically designed and safely installed for that use.
Avoid Heated Rocks
Do not use an electrically heated rock as the primary heat source.
Concentrated contact heat can create burns, especially when the animal remains in contact with the surface.
Step 4: Match the Thermostat to the Heater
A thermostat must be compatible with the type of heat source.
| Thermostat type | How it controls heat | Typical use |
|---|---|---|
| Dimming or proportional | Raises or lowers electrical output gradually | Visible incandescent or halogen lamps and compatible heat sources |
| Pulse proportional | Sends controlled pulses of power | Some non-light-emitting heaters |
| On/off | Switches power fully on and off | Some heat mats and compatible non-light heaters |
Do not use an on/off controller with a visible lamp unless the heater and thermostat manufacturer specifically approve that combination. Repeated full-power switching can cause visible flashing and unstable light.
Check:
- Local voltage
- Plug type
- Maximum thermostat load
- Minimum dimming load when relevant
- Heater compatibility
- Probe-failure behavior
- Power-loss behavior
- Manufacturer installation instructions
Never exceed the thermostat’s rated electrical load.
Step 5: Place and Secure the Thermostat Probe
Probe placement changes how the thermostat behaves.
A probe close to the heater may read much warmer than a probe at snake level. A probe touching a hot surface may produce a different result from one suspended in the air.
The correct position depends on:
- The species
- Heat-source type
- Enclosure design
- What the thermostat is intended to control
General rules:
- Secure the probe so the snake cannot move it
- Keep it away from direct contact with the bulb or heater
- Prevent the snake from wrapping around the cable
- Do not leave it loose beneath substrate
- Do not position it where water can reach the electrical connection
- Recheck its position after cleaning
A displaced thermostat probe can cause the controller to increase heat unexpectedly.
The thermostat display is only the reading at that probe. Always verify the rest of the enclosure independently.
Step 6: Install Warm- and Cool-Side Thermometers
Use at least two monitoring points:
- One in the warm zone
- One at the cool end
Two separate displays are often easier for beginners than moving one thermometer back and forth.
Place the probes where the snake actually spends time, without touching the heater.
Label them:
- Warm side
- Cool side
This makes daily checks faster and reduces the chance of adjusting the thermostat based on the wrong display.
Do Not Place Every Probe Together
The thermostat probe and the two monitoring probes have different jobs.
Placing all three at one point may leave the rest of the enclosure unmonitored.
Step 7: Verify Surfaces With an Infrared Thermometer
An infrared thermometer is useful for checking:
- Basking stone or shelf
- Warm hide floor
- Hide roof
- Substrate surface
- Middle-zone surfaces
- Cool-end surfaces
It measures surfaces, not air.
For more reliable checks:
- Aim at matte, non-reflective material
- Follow the device’s distance-to-spot guidance
- Do not measure through glass
- Repeat readings at several points
- Keep the sensor lens clean
- Do not point the laser at the snake or a person
The laser is an aiming aid. It does not perform the temperature measurement.
Step 8: Build Hides Into the Thermal Gradient
A temperature gradient is only useful when the snake can feel secure in more than one zone.
Provide at least:
- A warm-side hide
- A cool-side hide
The hides should be appropriately sized and secure enough for the snake to rest with its body touching the sides.
Depending on species, also provide:
- A humid hide
- Elevated cover
- Burrowing substrate
- Branches
- Additional visual barriers
Do not force the snake to choose between correct temperature and security.
A snake that remains hidden on the wrong side may be choosing the only place where it feels protected.
Step 9: Plan for Nighttime Heating
Visible lamps should switch off at night.
Whether additional nighttime heat is needed depends on:
- Snake species
- Room temperature
- Seasonal conditions
- Enclosure heat retention
- Safe nighttime range
When nighttime heat is necessary, use a suitable non-light-emitting source controlled by its own compatible thermostat.
Do not use colored night bulbs to keep the enclosure visibly illuminated.
A natural nighttime temperature drop may be appropriate for some species, but the enclosure must not fall below that species’ safe range.
Step 10: Protect the Snake From the Heater
Heaters can become hot enough to burn skin.
Use a suitable protective guard when:
- A bulb or ceramic emitter is installed inside the enclosure
- The snake can climb toward the fixture
- The species is likely to wrap around equipment
- A radiant panel or heater surface could be contacted
Also check:
- Cable routes
- Lamp clamps
- Fixture stability
- Screen strength
- Ventilation clearances
- Distance from flammable material
Never rest a hot fixture directly against plastic, wood, fabric or other material unless the installation is explicitly designed for it.
Step 11: Test the Empty Enclosure
Run the complete setup for at least 24–48 hours before introducing the snake.
Check readings:
- Soon after the heat switches on
- After several hours of operation
- During the warmest part of the day
- Before the heat switches off
- During the night
- When the room temperature changes
Pre-Arrival Test
Confirm that:
- The thermostat regulates the heater consistently
- The warm zone reaches the species-specific target
- The cool end remains within a safe range
- Warm-hide surfaces have been checked
- The snake can retreat completely from the heat
- All probes remain secured
- No hot equipment is accessible
- Visible lights switch off at night
- Nighttime temperatures remain safe
- The enclosure does not smell of overheated plastic or wiring
- The thermostat does not flicker or cycle the heater incorrectly
- The electrical load is within the manufacturer’s rating
Do not introduce the snake while you are still making large daily adjustments.
How to Read Conflicting Temperature Advice
Care guides may give different numbers because they are measuring different things.
| Term | What it may mean |
|---|---|
| Basking temperature | The surface directly beneath overhead heat |
| Warm-side temperature | Air temperature somewhere in the warm half |
| Warm hide temperature | The floor, surface or air inside the warm hide |
| Ambient temperature | General enclosure air temperature |
| Cool-side temperature | Air or surface temperature at the cooler end |
Before copying a number, ask:
- Which species is it for?
- Is it air or surface temperature?
- Where is the probe?
- Is it a daytime or nighttime target?
- What enclosure type is being used?
Example: Corn Snake Heating Framework
This article is a general heating guide, but a corn snake illustrates how the system works.
A commonly used starting reference is:
- Basking or warm zone: approximately 28–30°C / 82–86°F
- Cool end: approximately 20–24°C / 68–75°F
- Nighttime: a natural drop may be appropriate when the room remains safe
These values should be verified against the specific care guidance being followed.
A corn snake setup may include:
- A controlled overhead daytime heat source
- A warm-side thermometer
- A cool-side thermometer
- An infrared surface thermometer
- A warm hide
- A cool hide
- A separate hygrometer
Do not apply the same numbers automatically to a ball python or another snake species.
Common Snake Heating Mistakes
1. Buying the Heater Before Researching the Species
The correct heater depends on the snake and enclosure.
2. Using Heat Without a Thermostat
Every heater needs appropriate regulation.
3. Placing the Heater in the Center
This can reduce the usable gradient.
4. Using Only One Thermometer
One reading cannot confirm both ends of the enclosure.
5. Treating the Thermostat Display as the Whole Enclosure
It shows only the control-probe location.
6. Leaving the Probe Loose
A snake can move or bury a loose probe, changing the controller’s behavior.
7. Measuring Air With an Infrared Thermometer
Infrared thermometers measure surfaces.
8. Using Visible Light All Night
A normal dark period should be preserved.
9. Allowing Contact With the Heater
Snakes climb, push and wrap around objects. Guards and secure installation matter.
10. Copying a Temperature Setting From Another Enclosure
The same thermostat setting can produce different results in a different room or enclosure.
11. Ignoring Humidity
Heating can dry an enclosure, while restricted ventilation can make it damp. Temperature and humidity should be monitored together according to species needs.
12. Testing Only Once
Seasonal and daily room-temperature changes affect the setup.
Troubleshooting the Heating Gradient
| Problem | Possible cause | What to check |
|---|---|---|
| Warm side is too cool | Heater too weak, too high or heavily blocked by mesh | Wattage, mounting distance, room temperature and thermostat setting |
| Cool end is too warm | Enclosure too small, heater centered or room too hot | Heater position, enclosure length and ventilation |
| Thermostat reads correctly but surfaces are too hot | Control probe is measuring a different location | Probe placement and infrared surface readings |
| Lamp flashes on and off | Incompatible on/off control or incorrect settings | Thermostat type and heater compatibility |
| Temperatures change after cleaning | Probe or décor moved | Restore and secure the original positions |
| Nighttime temperature falls too low | Cold room or poor enclosure heat retention | Species requirements and a separately controlled lightless heater |
Need a Coordinated Corn Snake Heat-Control System?
The Corn Snake Heat Control & Temperature Monitoring Starter Kit is organized around the framework described in this guide:
- Focused daytime halogen heating
- PID heat regulation
- Separate warm- and cool-side probe thermometers
- Infrared surface-temperature checks
Explore the Corn Snake Heat Control & Temperature Monitoring Starter Kit
This kit is not a complete habitat. A suitable enclosure, hygrometer, hides, water, UVB lighting, substrate and other species-appropriate furnishings are still required.
You can also browse the Snake Habitat Setup collection.
Frequently Asked Questions
Does every snake need a heat lamp?
No. The correct heating method depends on species, enclosure and household temperature. Many snakes benefit from controlled overhead heat, but other safely regulated systems may be appropriate.
Does every snake heater need a thermostat?
Yes. Any artificial heat source should be controlled by a compatible thermostat.
Where should the heat source go?
Usually at one end of the enclosure so the snake can move between warm and cool zones.
Where should the thermostat probe go?
At the specific point the controller is intended to regulate. It must be secured and positioned according to the heater and enclosure design.
Do I still need thermometers when I have a thermostat?
Yes. The thermostat controls the heater, while thermometers independently monitor the enclosure.
How many thermometers should a snake enclosure have?
A practical beginner setup uses at least one warm-side reading and one cool-side reading, plus an infrared thermometer for surface checks.
Can I use an infrared thermometer instead of probe thermometers?
No. Infrared thermometers measure surfaces, while probe thermometers measure their local air or contact point.
Can I use a heat mat without a thermostat?
No. Heat mats and heat tape can overheat and must be controlled by a compatible thermostat.
Can I leave a halogen bulb on overnight?
No. Visible daytime heat should normally switch off at night. Use separately controlled lightless heat only when the species and room conditions require it.
Are red night bulbs safe for snakes?
A normal dark period is preferable. Use a non-light-emitting heat source when nighttime heating is necessary.
Why is my cool side too warm?
The enclosure may be too small, the heater may be centered, the room may be hot or ventilation may be insufficient.
Can one heating kit work for every snake?
No. The same equipment may sometimes be reused, but target temperatures, humidity and installation must be evaluated for the exact species.
How long should I test the enclosure?
Run and monitor the finished setup for at least 24–48 hours before adding the snake.
Final Snake Heating Checklist
Before introducing the snake, confirm:
- The exact species requirements have been researched
- The heat source is appropriate for the enclosure
- The heat source is positioned at one end
- The thermostat is compatible with the heater
- The thermostat load rating is not exceeded
- The control probe is secured
- Warm- and cool-side temperatures are independently monitored
- Surfaces have been checked
- Warm and cool hides are available
- The snake cannot contact hot equipment
- All cables and fixtures are secure
- Visible heating switches off at night
- Nighttime conditions remain within the species’ safe range
- Temperature and humidity are monitored together
- The empty enclosure has been tested for 24–48 hours
The safest heating system does not force a snake to remain at one temperature. It creates controlled choices and verifies that those choices remain available over time.
This guide provides general enclosure-heating information and does not replace species-specific care guidance or advice from a reptile-experienced veterinarian. Follow the electrical ratings, mounting distances and safety instructions supplied by each equipment manufacturer.